Creating Web Clip Widgets
L
eopard makes it easy
to create a Dashboard widget from a segment of a web
page. For example, you can capture a “new releases”
list from a media website, or the “latest posts”
field from an Internet discussion group. These Web
Clips appear, automatically updated, whenever you
open Dashboard.
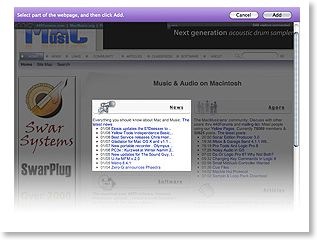
Here’s an example, using www.macmusic.org,
a cool music software website. We navigated to their
home page in Safari and clicked the Web Clip button
(next to the address field).

The
entire page darkens save for a bright rectangle. Drag
the rectangle from its center and edges until it
covers the segment you want to capture. Then click
Add and Safari sends your Web Clip to
Dashboard.
(If
Safari doesn’t display the Web Clip button, choose
Customize Toolbar in Safari’s View menu and add the
button to Safari’s toolbar.)
Now
the Web Clip appears as a new widget in Dashboard.
You can still edit it: Move your cursor over the
widget’s lower-right corner until a small letter i
appears. Click it to resize or reposition the
content, or customize its border using built-in
styles.
Apple Unveils Near Final Mac OS X Leopard
WWDC 2007, SAN FRANCISCO—June 11, 2007—
A
pple® today unveiled a near final version of Mac OS® X Leopard, the sixth major release of the world’s most advanced operating system. Scheduled to ship in October, Leopard introduces over 300 new features, including a new Desktop and Dock with Stacks, an intuitive new way to organize files; an updated Finder featuring Cover Flow™ and a new way to easily browse and share files between multiple Macs; Quick Look, a new way to rapidly preview most files without opening an application; Time Machine, a new way to easily and automatically back up and restore lost files or a complete Mac®; Spaces, a powerful new feature to create groups of applications and instantly switch between them; and enhanced iChat and Mail applications, which easily allow users to communicate even more creatively. Read More...
Determining Battery Cycle Count
This tip describes how Mac users with portable computers running Mac OS X 10.4.x or later can determine the number of cycles on a battery.
- Open Apple System Profiler (Choose About this Mac from the Apple menu and then click on the More Info button).
- Click Power in the Contents list (under the Hardware section as seen below).
- Cycle Count is listed under the Battery
Information section.
Notes
-
A properly maintained Apple notebook battery is designed to retain up to 80 percent of its original capacity after 300 full charge and discharge cycles.
-
A charge cycle means using all of the battery’s power, but that doesn’t necessarily mean a single charge. For instance, you could use your notebook for an hour or more one day, using half its power, and then recharge it fully. If you did the same thing the next day, it would count as one charge cycle, not two, so you may take several days to complete a cycle.
-
Searching Just Your Bookmarks
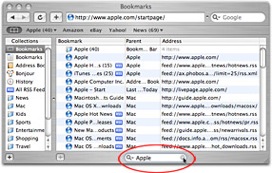
If you’re trying to search for a particular bookmark, you’ll want to know this trick: First, click on the Show All Bookmarks icon in the top-left corner of the Bookmarks Bar. Doing this makes the Collections column visible on the left side of Safari, but more importantly, it adds a Search field at the bottom center of the Safari window. When you type search terms in this field, it searches just within your bookmarks, so you get super-fast results.
Top 30 Mistakes Made By New Mac Users When Switching From Windows
-
Closing an application window, thinking it has quit.
-
Downloading an app and running it from the disk image.
-
Creating endless untitled folders.
-
Using Safari’s Google search to get to a website.
-
Confusing the concept of wallpaper with screensaver.
Mac OS: Versions, builds included with Intel-based Macs
Important: You cannot normally use a Mac OS version earlier than the one included with the computer.
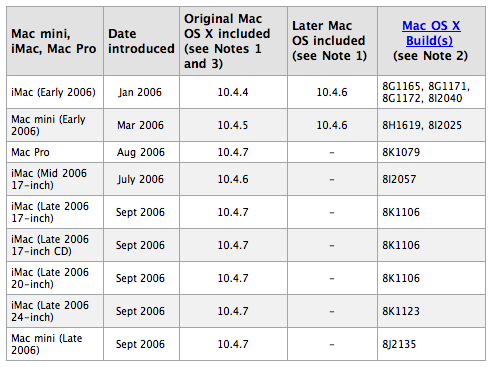
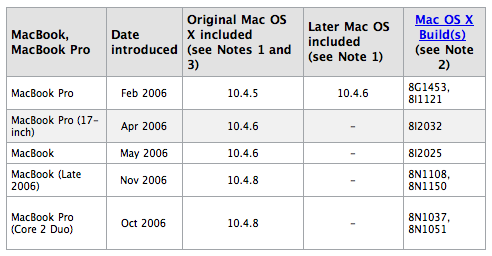

Notes
-
"Some computers shipped with different Mac OS X versions at different times. When a computer was not bundled with a later version, a "-" appears in the "Later Mac OS included" column.
-
The build information is available in the About This Mac window.
-
Some Macs may include a slightly later build version (but same numbered version) of Mac OS X on the Install or Restore discs than was preinstalled on the computer.
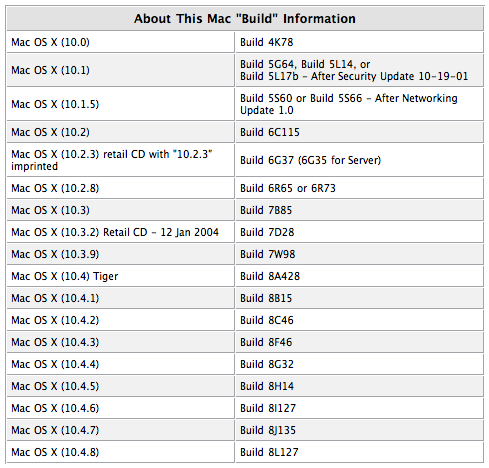
Mac OS X: About This Mac "build" information
Learn about build versions, such
as "Build 8L127," which appear in the About This
Mac window and System Profiler.
The
build version you see depends on the version of Mac
OS X that you have installed. The version changes
when you use the Software Update feature to update
core system software.
Burning Multiple Times to the Same CD
G
enerally, when you burn files to a
CD once, you’re done — you can’t burn to that CD
again. Unless you use this little trick: First
create a new folder and give it a descriptive name
(something like “burn baby burn!” Kidding). Now put
the files you want to burn into that folder, then
go to the Applications folder and open the
Utilities folder. Double-click on Disk Utility.
When it comes up, go under the File menu, under
New, and choose Disk Image from Folder, and then
when the Open dialog appears, find that folder with
the stuff you want to burn and click the image
button. A Save dialog appears in which you can
leave the name as is or choose a new name (leave
the other controls alone), and then click Save. In
a few moments, a disk image of your folder’s
contents will appear in the list on the left side
of the Disk Utility dialog. Click on that icon, and
then click the burn button at the top left of the
Disk Utility dialog.
When you click the Burn button, a dialog will
appear asking to insert a disc. Do so, and then
click once the blue downward-facing triangle on the
right side of this dialog to show more options.
Click on the checkbox for Leave disc appendable,
then click the Burn button. Your data will now be
written to that CD. To add more files later, just
insert that same CD and then you’ll use this same
process all over again, but when you get to that
final burn dialog, the button won’t say “Burn” this
time, instead it will say “Append” because you’re
adding these files to the same disc. By the way,
don’t forget to remove the files you already burned
to this disc from your “burn baby burn!” folder
(and the DMG file it creates) before you make your
next disc image.
Mac OS X: About This Mac window provides computer serial number
You
can use the About This Mac window to find your
computer's serial number when started up from Mac
OS X 10.1 or later.
Follow these
steps:
Choose About This Mac from the Apple Menu.
Double-click the version text,
for example "Version 10.1".
Your computer's serial number now
appears where the version text had been.
Note: Some earlier Mac OS X-compatible computers do
not have their serial numbers stored in a way that
allows this feature to work.
Lack of this feature on your computer does not indicate any software or hardware failure.
How to change the volume on your Mac without that little sound

D
epending on the type of keyboard
you have, you may be able to use the volume keys on
your keyboard (the ones with a speaker icon) to
change the volume of your computer’s speakers. When
you press one of these keys, normally you hear the
alert sound play to let you hear the new volume. If
you want, you can prevent the alert sound from
playing when you change the volume.
To turn off the volume keys’ sound feedback, choose
Apple menu > System Preferences and click Sound.
Click Sound Effects and deselect the “Play feedback
when volume keys are pressed” checkbox.
To temporarily turn off the volume keys’ sound
feedback, hold down the Shift key when you press a
volume key. Not all keyboards have volume keys. If
you don’t see keys with speaker icons, you cannot
change your computer’s volume using your
keyboard.
Where Did That Download Come From?
If
you download a file from the web, you can usually
find out exactly where that downloaded file came
from (including the exact web address) by pressing
Command-I when you have the file selected.
Once the info dialog appears, click on the
right-facing arrow beside More Info to expand that
panel and it will display a Where from header, and
to the right of that it will show the exact web
address from which the file was originally
downloaded.